Orthographic drawing, also known as engineering drawing, is a fundamental skill for anyone interested in fields like engineering, architecture, or design. It involves representing a three-dimensional object on a two-dimensional surface by displaying multiple views of the object from different angles. These drawings provide crucial information about the shape, size, and dimensions of an object.
In this blog post, we will dive into the principles of orthographic drawing and explore various aspects of this essential technique. We will unravel the mysteries behind the possible orthographic views of an object, demonstrate the usage of thick and black line types, and explain the six principles of creating accurate and precise orthographic views.
Whether you are a beginner looking to understand the basics or an experienced professional seeking a refresher, this blog post will equip you with the knowledge you need to create detailed and comprehensive orthographic drawings. So, let’s get started on this exciting journey into the world of orthographic drawing!
The Principles of an Orthographic Drawing
When it comes to creating an orthographic drawing, there are certain principles that one must adhere to. These principles not only ensure accuracy but also help convey the necessary information in a clear and concise manner. So, let’s dive in and explore the key principles of an orthographic drawing.
1. Projection: Mastering the Art of Perspective
Projection is the foundation of every orthographic drawing. It involves the accurate representation of a three-dimensional object onto a two-dimensional plane. Think of it as translating the physical world onto paper. This involves understanding and applying principles such as foreshortening and vanishing points. So, grab your pencils and let’s get this perspective party started!
2. Scale: Making Measurements a Piece of Cake
We all know size matters, especially in orthographic drawings! Scale plays a crucial role in ensuring that the proportions of the object are accurately represented. By using a consistent scale, you can easily convey the relationship between different parts of the drawing. So, get your ruler ready and let’s measure our way to precision!
3. Lines: Drawing the Line Between Perfection and Chaos
Lines are the bread and butter of orthographic drawings. They help define the shape, size, and details of the object being represented. From bold, solid lines to delicate dashed lines, each type serves a specific purpose. So, grab your pen and let’s start sketching those smooth lines like a boss!
4. Symbols and Conventions: Decoding the Orthographic Secret Language
Imagine if orthographic drawings were a secret code that only a select few could decipher. Well, luckily for us, they’re not! Thanks to symbols and conventions, we can communicate complex information quickly and effectively. From arrows indicating dimensions to hidden lines revealing hidden features, these symbols add clarity to our drawings. So, put on your detective hat and let’s unlock the secrets of orthographic symbolism!
5. Consistency: Keeping it Real…ly Accurate
Consistency is key in the world of orthographic drawings. Maintaining a consistent style and approach throughout the drawing ensures clarity and professionalism. From consistent usage of line weights to standard dimensioning practices, these small but mighty details make a big difference. So, tighten your grip on that pencil and let’s strive for picture-perfect consistency!
6. Neatness: Tidy Drawings for a Tidy Mind
Last but not least, neatness counts. Keeping your orthographic drawing clean and tidy goes a long way in conveying professionalism and precision. A clutter-free drawing helps the viewer focus on the important details without any distractions. So, break out your eraser and tidy up those lines because a neat drawing is a happy drawing!
Now that you’ve grasped the principles of an orthographic drawing, it’s time to put them into practice. Remember, with projection, scale, lines, symbols, consistency, and neatness on your side, you’ll be creating impressive and accurate orthographic drawings in no time. So, go forth, sketch like a champ, and let the principles guide you to orthographic drawing mastery!
FAQ: Principles of an Orthographic Drawing
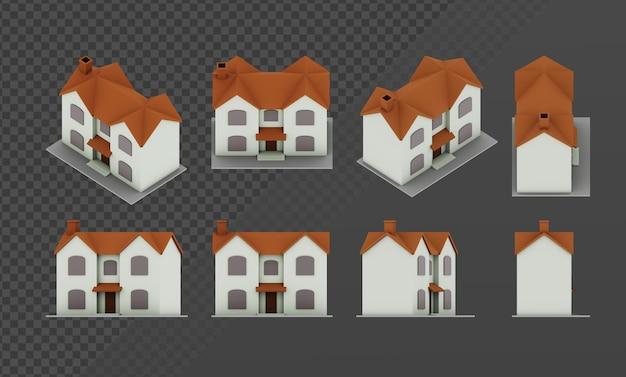
What are the possible orthographic views of an object? Can you provide examples
Orthographic drawings represent a three-dimensional object in a two-dimensional format using multiple views. The typical orthographic views include top view, front view, right-side view, left-side view, rear view, and bottom view. Each view provides a different perspective of the object, aiding in its accurate depiction.
For example, let’s imagine you’re preparing an orthographic drawing for a shoebox. The top view would show the rectangular shape with the length and width dimensions. The front view would illustrate the height and width dimensions, showcasing the box’s opening and closing mechanism. The right-side view would reveal the side of the box, emphasizing its length and height. The left-side view would display the opposite side, providing a complete understanding of its dimensions. The rear view would present the back portion of the box, while the bottom view would exhibit its base.
Which line type is thick and black
Ah, the mighty bold line. In orthographic drawings, thick and black lines are commonly used to represent visible edges of an object. These bold lines ensure the important details stand out and give the drawing a visual punch. Just like a superhero in a comic book, the bold lines make everything pop! They help define the shape, outline, and structure of the object, making it easier to interpret.
Remember, in the world of orthographic drawings, bold lines are the superheroes that save us from confusion!
What are the six principles of view
The magic number here is six! The six principles of view in orthographic drawings are principle view, auxiliary view, sectional view, detail view, assembly view, and pictorial view. Each of these principles serves a unique purpose in creating a comprehensive and detailed representation of an object.
-
Principle View: This is the main view of an object that provides the most complete and detailed representation.
-
Auxiliary View: Sometimes, to understand complex features, additional views are needed. Auxiliary views present these surfaces at an angle different from the principle view.
-
Sectional View: When we need to see the object’s hidden internal details, we employ sectional views. These views slice the object to reveal what’s beneath the surface.
-
Detail View: In instances where a small area of the object requires magnification for clarity, detail views come to our rescue. They focus on specific features that demand attention.
-
Assembly View: Assembly views help in visualizing how different parts of a product fit together or how an object is constructed. They show relationships between components.
-
Pictorial View: These views are like the Mona Lisa of orthographic drawings – they offer a more realistic glimpse of the object, presenting it in a way that resembles its actual appearance.
What are the principles of an orthographic drawing
Creating a stellar orthographic drawing follows a set of fundamental principles. Understanding and adhering to these principles ensures the accuracy and clarity of the drawing.
-
Orthogonality: Orthographic drawings rely heavily on right angles and perpendicular lines to maintain accurate proportions and dimensions. It’s all about keeping things square and aligned!
-
Projection: Orthographic drawings use projection techniques to represent three-dimensional objects on a two-dimensional surface. Through projections, we can portray the object from different viewpoints.
-
Dimensioning: To avoid any ambiguity, orthographic drawings include precise dimensions. Clear and accurate measurements help bring the design to life.
-
Line Types: Different line types play distinct roles in orthographic drawings. From bold lines indicating visible edges to dashed lines representing hidden or internal features, each line type has a specific purpose and tells a part of the object’s story.
-
Scale: Scale is everything! Orthographic drawings are typically created at a specific scale to ensure accurate representation. Scaling helps translate real-life dimensions onto paper or a computer screen.
-
Annotation: Annotations come to the rescue when words are needed to describe specific features, materials, or crucial instructions related to the object being drawn. They provide additional information and clarify any doubts.
Remember, these principles are the building blocks of a perfectly executed orthographic drawing that leaves no room for confusion—an orthographic masterpiece, if you will!
And there you have it! The FAQ section has answered some burning questions you may have had about orthographic drawings. Now, armed with this knowledge, you can confidently venture into the world of orthographic drawings like a pro!