Have you ever wondered how to take off the back door panel of your Chevy Silverado? Whether you want to upgrade your door speakers or fix a window motor, removing the door panel is often the first step. In this blog post, we will guide you through the process, providing you with clear instructions and tips along the way. So, if you have a 2010 Chevy Silverado or any other model year, this guide is for you!
But before we dive into the removal process, let’s address another common question: what size door speakers are in a 2010 Chevy Silverado? Or perhaps you have a 2011 GMC Sierra and are curious about the speaker size for that model year. Don’t worry, we’ve got you covered! We’ll discuss the speaker sizes for various Silverado and Sierra models, including the extended cab versions.
So, grab your tools and let’s get started on removing that back door panel like a pro!
(Note: This blog post is up-to-date as of 2023.)
How to Master the Art of Removing the Back Door Panel on Your Chevy Silverado
So you find yourself in a predicament – you need to access the inner workings of your Chevy Silverado’s back door panel, but you have no idea where to start. Fear not, my friend! With a little guidance and a touch of humor, you’ll have that panel off like a pro in no time. Buckle up and let’s get started!
The Tools of the Trade
Before we dive into the nitty-gritty, it’s essential to gather your tools. Remember, a true DIY enthusiast always has their toolbox well-stocked. Here’s what you’ll need:
- Screwdriver: This trusty companion will be your best friend throughout the process. Make sure it’s the right size to tackle those screws.
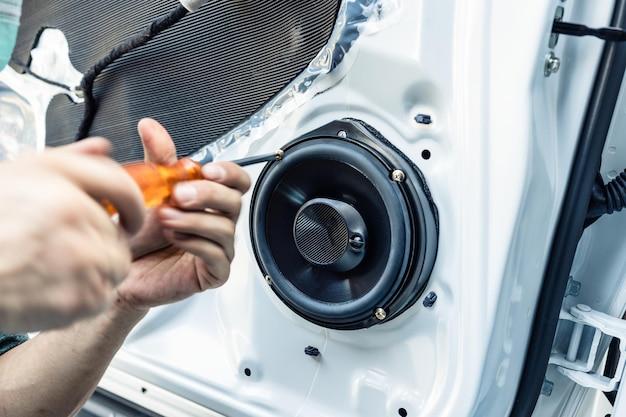
- Trim Removal Tool: This nifty gadget helps prevent any cosmetic casualties along the way. Protect that precious door upholstery!
- Patience: This might not be a physical tool, but boy, will you need it. Rome wasn’t built in a day, and neither was your Silverado’s back door panel removal.
Step 1: Firmly Planted Feet
In this dance with your Silverado’s back door panel, it’s crucial to have a solid foundation. Put on your favorite tunes, find a nice, level surface, and plant your feet firmly. You’re about to become a panel removal maestro!
Step 2: Unleashing the Screws
Every superhero has an arch-nemesis, and in this case, it’s the screws holding the back door panel in place. Locate these sneaky troublemakers and unleash your screwdriver’s might to remove them one by one. Just remember, no supervillains were harmed in the making of this DIY adventure.
Step 3: Embracing the Trim
With the screws banished, it’s time to show the trim who’s boss. Gently insert your trusty trim removal tool between the panel and the trim, and let the magic happen. With a little finesse and a dash of determination, the trim will surrender, revealing hidden treasures underneath.
Step 4: The Drama of Disconnecting
Prepare for a bit of drama as you disconnect the electrical connectors lurking behind the scenes. These connectors may be hesitant to part ways, but fear not! With your deft hands and a touch of firmness, they’ll have no choice but to bid adieu.
Step 5: Free at Last
Congratulations! You’ve made it to the grand finale. With the screws vanquished, the trim removed, and the connectors disconnected, it’s time to set the back door panel free. Gently tug and pull, treating it with the respect it deserves. Voila! Your Silverado’s back door panel is now in your capable hands.
Step 6: Reflection and Reassembly
Take a moment to reflect on your conquest before diving into the reassembly process. Make sure you’ve achieved your goal, whether it’s fixing a window mechanism or upgrading your sound system. Then, follow the steps in reverse order to return the back door panel to its rightful place. Revel in the satisfaction of a job well done!
Now that you hold the key to unlocking the secrets behind removing the back door panel on your Chevy Silverado, go forth and conquer! Remember, with a dash of bravery, a sprinkle of humor, and a willingness to get your hands dirty, you can tackle any DIY challenge that comes your way.
Good luck, and may your back door panel removal adventures be nothing short of legendary!
FAQ: Taking the Back Door Panel Off a Chevy Silverado
How Do You Remove the Back Door Panel on a Chevy Silverado
Removing the back door panel on a Chevy Silverado may seem daunting, but fear not! With a little guidance and the right tools, you’ll have that panel off in no time. Here’s a step-by-step breakdown for your convenience:
-
Preparation is Key: Before diving in, ensure the door is fully closed. You wouldn’t want it swinging open while you’re in the midst of panel removal, now would you?
-
Power Down: Disconnect the negative battery cable like a responsible car doctor. Safety first, and all that jazz!
-
Uncovering Hidden Secrets: Begin by locating and removing any screws or bolts securing the door handle, armrest, or window crank. Pro-tip: Keep them in a safe place; they tend to have a sneaky way of rolling off under the seat!
-
Embrace Prying: This step calls for your inner “gentle Hulk” persona. Use a panel removal tool or a flathead screwdriver (wrapped in a soft cloth to prevent scratches) to gently pry the door panel away from its clingy clips. Take your time and give those clips a little persuasion. Don’t worry, they’re used to this kind of treatment.
-
Unplugging Party: With the panel set free, unplug any electrical connectors responsible for functions like power windows, locks, and mirrors. Be extra careful—it’s like disconnecting the life support, but for car features.
-
Panel Liberation: Lift the panel upwards, freeing it from its snug grip on the window channel. Voila! Your panel is finally liberated from its confining door prison.
What Is the Speaker Size for a 2010 Chevy Silverado
Ah, the harmonious symphony of sound awaits in your trusty 2010 Chevy Silverado. But before you blast your favorite tunes, you may wonder about the speaker size. Fear not, dear music lover; we have the answer!
In the 2010 Chevy Silverado, the door speakers boast a traditional size of 6.5 inches—perfect for embracing those bass-filled beats and mellifluous melodies. So go ahead and let the good vibrations flow!
What Speaker Size Fits a 2011 GMC Sierra
The 2011 GMC Sierra is ready to accompany you on your musical adventures, but first, let’s ensure the perfect fit for your sonic needs. The door speakers in this model possess a robust diameter of 6.75 inches. So, whether your playlist is pumping rock anthems or soothing jazz tunes, your ears will be in for a treat!
What Speaker Size Is Ideal for a 2010 Chevy Silverado Extended Cab
Ah, an extended cab—a sanctuary for both passengers and music enthusiasts alike. In the realm of the 2010 Chevy Silverado extended cab, the door speakers prefer a diameter of 6×9 inches. With their larger size, they’re eager to project a sonic landscape that fills every corner of your truck cabin. Prepare for audio bliss on your next road trip!
And there you have it—answers to your burning questions about the Chevy Silverado back door panel removal and speaker sizes! Armed with knowledge and a hint of humor, you’re ready to tackle these tasks like a seasoned automotive aficionado. Happy wrenching, my friend!
Please note: The information provided in this FAQ segment is valid for the year 2023 and pertains specifically to the Chevy Silverado and GMC Sierra models mentioned. Keep in mind that manufacturers may alter specifications, so it’s always wise to double-check before diving into any DIY projects.